Repurposing old furniture is a rewarding way to combine creativity with sustainability. Instead of discarding outdated or damaged pieces, you can transform them into functional and stylish decor elements for your home. With the right tools and a little imagination, furniture that might otherwise end up in the landfill can become a cherished centrepiece.
In this guide, we’ll dive deep into seven innovative Repurposing Old Furniture DIY furniture projects, each designed to inspire your creativity and reduce waste. Whether you’re a seasoned DIY enthusiast or a beginner, these ideas will help you unlock the hidden potential of old furniture.
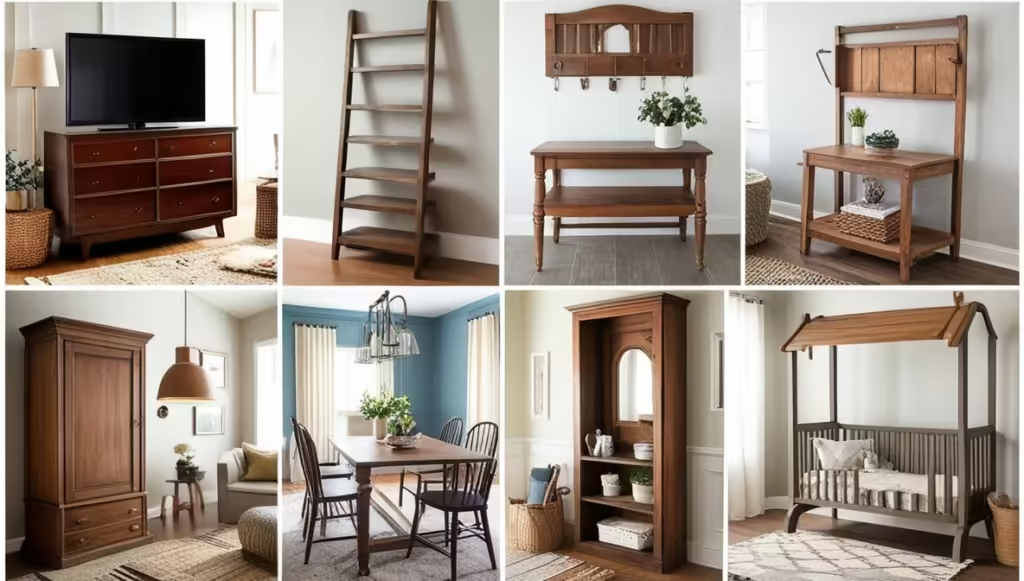
1. Turning an Old Dresser into a Stylish TV Stand
Why It Works:
Dressers are often built to last, making them ideal candidates for repurposing. Their wide tops and multiple drawers offer the perfect foundation for a functional and organized TV stand.
Detailed Steps to DIY:
- Preparation and Assessment:
Begin by assessing the condition of the dresser. Tighten loose screws and fix any structural damage. Clean the surface thoroughly to remove dirt and grease. - Sand and Prime:
Sand down the dresser using medium-grit sandpaper to remove the existing finish. Follow with a fine-grit sandpaper for a smooth surface. Apply a primer to help the new paint adhere. - Reconfiguring Drawers:
Remove one or two top drawers to create open shelves. These will be used for devices like cable boxes, gaming consoles, or streaming sticks. Sand the inside surfaces for a uniform look. - Painting or Staining:
Choose a color or stain that complements your room. For a rustic vibe, use a wood stain; for a modern look, opt for bold or neutral paints. - Adding New Hardware:
Replace old knobs with sleek, contemporary handles or vintage-inspired pulls. - Cable Management:
Drill small holes at the back of the open shelves to organize cables and keep them out of sight.
Creative Variations:
- Add a sliding barn door for a farmhouse-inspired aesthetic.
- Use decorative wallpaper or fabric to line the drawer interiors for a fun pop of color.
Estimated Time: 4-6 hours depending on the complexity.

2. Transforming a Wooden Ladder into a Bookshelf
Why It Works:
Old ladders are surprisingly versatile and can be transformed into functional bookshelves or display units. Their natural shape lends itself to a tiered design that’s perfect for compact spaces.
Step-by-Step Guide:
- Preparation:
Check the ladder for stability and make necessary repairs. Sand the surface to remove splinters or old paint. - Design Choices:
Decide whether you want a leaning bookshelf or a free-standing piece. For leaning designs, secure the top to the wall with brackets. - Adding Shelves:
Cut wooden planks to fit across the ladder’s steps. Attach them using screws or brackets for stability. - Finish:
Paint or stain the ladder to match your room’s aesthetic. For a boho look, consider distressing the wood for a weathered finish. - Styling:
Arrange books, potted plants, or decor items on the shelves. Use baskets for a mix of storage and style.
Creative Twist: Use a double-sided ladder to create a freestanding shelf by adding planks across both sides.

3. Repurposing a Coffee Table into a Bench
Why It Works:
Coffee tables are low and sturdy, making them perfect for transformation into benches for entryways, patios, or bedrooms.
Extended DIY Process:
- Preparation:
Remove any glass inserts or decorative elements that don’t suit the new purpose. - Cushioning:
Measure and cut foam padding to fit the tabletop. Secure the foam with spray adhesive. - Fabric Selection:
Choose a durable and stylish fabric. Stretch it over the foam, ensuring there are no wrinkles, and staple it to the underside of the table. - Leg Enhancements:
Sand and paint the legs for a cohesive look. You can even replace them with hairpin legs for a modern touch. - Optional Storage:
Add a small shelf underneath for shoes or baskets.
Extended Use Cases:
- Place it at the foot of your bed as a decorative seating area.
- Use it in your mudroom as a functional bench for putting on shoes.

4. Reinventing a Headboard into a Coat Rack
Why It Works:
Headboards often feature intricate woodwork or unique designs, making them a charming base for creative repurposing projects.
Extended Guide:
- Preparation:
Detach the headboard from its frame and clean it thoroughly. Sand any rough edges. - Customization:
Paint the headboard in a bright color for a playful look or stain it to highlight the natural wood grain. - Hook Installation:
Select hooks based on the style—bronze hooks for vintage appeal, sleek metal for a modern vibe. Attach them evenly across the headboard. - Wall Mounting:
Secure the headboard to the wall using anchors or brackets. Make sure it’s at a comfortable height for coats and bags. - Decorative Additions:
Add a small chalkboard or decorative plaque to personalize the piece.
Pro Tip: Hang string lights around the headboard to double as a decorative element.

5. Upcycling an Old Door into a Dining Table
Why It Works:
Doors, especially vintage ones, often have beautiful details that can add character to a dining table.
Detailed Steps:
- Preparation:
Remove any hinges or hardware and sand the surface thoroughly. - Reinforcing the Door:
Attach a sheet of plywood to the underside for added stability. - Leg Options:
Use sturdy pre-made table legs or repurpose another piece of furniture like a dresser base. - Surface Protection:
Add a tempered glass top for easy cleaning and to preserve the door’s detailing. - Finish:
Paint or stain the door to match your dining area.
Variations: Create a coffee table or a desk instead of a dining table for smaller spaces.

6. Converting a Wardrobe into a Home Office Nook
Why It Works:
This project is perfect for compact living spaces where maximizing functionality is essential.
Detailed Steps:
- Interior Design:
Remove the inner shelves and rods to create an open workspace. - Desk Surface:
Install a wide, sturdy shelf at desk height. - Storage Solutions:
Use small baskets or bins for organizing supplies. Add hooks to the doors for hanging items. - Lighting:
Install battery-operated LED strip lights for a bright workspace. - Aesthetic Touches:
Line the interior with wallpaper or fabric to make the workspace inviting.

7. Revamping a Crib into a Porch Swing
Why It Works:
Repurposing a crib is a nostalgic and charming way to create a cozy outdoor seating area.
Detailed Instructions:
- Disassembly:
Remove one side of the crib. Retain the base and other sides for structural support. - Reinforcement:
Strengthen joints with additional screws and brackets. - Hanging Mechanism:
Attach eye bolts to the crib and secure it with heavy-duty ropes or chains. - Paint:
Use weather-resistant paint to protect it from the elements. - Cushions:
Add outdoor cushions and pillows to make the swing comfortable.

Tips for Beginners
- Start with small projects to build confidence.
- Invest in basic tools like a sander, screwdriver set, and drill.
- Watch online tutorials to learn techniques like distressing or staining.
Conclusion – Repurposing Old Furniture
Repurposing old furniture is more than just a hobby—it’s a sustainable and creative way to enhance your living space. These seven projects offer endless possibilities for personalization and functional design. Whether you’re saving money or exploring your artistic side, the results are always rewarding.

Haris Virk is the creative force and expert content strategist behind ScrapSafari.com. As an accomplished writer and designer, Haris leads the development of innovative content and visually stunning images that captivate audiences. His extensive experience in crafting engaging articles and unique design ideas makes him a pivotal contributor to ScrapSafari’s success.
Haris’s keen eye for aesthetics and trend forecasting ensures that every piece he produces not only informs but also inspires readers. His proficiency extends to mastering Pinterest strategies, where his thoughtfully crafted pins drive significant traffic and amplify the site’s reach.
With a passion for creativity and a deep understanding of content dynamics, Haris Virk brings a distinctive blend of originality and strategic thinking to the ScrapSafari team, solidifying its place as a go-to source for design, ideas, and inspiration.