A wood kiln is an enclosed, insulated chamber used for drying and curing lumber by controlling temperature, humidity, and airflow. Unlike air drying which can take months or years, kiln drying accelerates the process to just days or weeks. This rapid drying reduces defects like warping, checking, and case hardening.
The kiln works by circulating heated air over stacked wood while carefully removing moisture. As hot air moves through the chamber, it picks up moisture from the wet wood. A venting system then expels this humid air outdoors while fresh, drier air is drawn in and reheated. By gradually raising the temperature and lowering humidity, the wood releases its internal moisture content until reaching an ideal dryness for woodworking projects.
Compared to air drying, kiln drying offers numerous advantages. It produces straighter, more stable lumber with less cupping, twisting or other deformities. The controlled environment prevents staining, mold, and insect damage. And the much faster drying time means you can quickly season freshly cut wood for immediate use. While air drying may require years, a small kiln can dry 1″ thick hardwood boards in just 1-2 weeks.
Benefits of Kiln Drying Your Own Wood
Kiln drying your own wood at home offers several key advantages over traditional air drying methods:
Faster Drying Times
One of the biggest benefits of kiln drying is the dramatically reduced drying time compared to air drying. While air drying can take 6-12 months or longer, kiln drying allows you to dry freshly cut lumber in a matter of weeks or even days. This means you can work with your lumber much sooner.
Better Moisture Control
In a kiln, you can precisely control temperature, airflow, and humidity levels to achieve the optimal moisture content for your woodworking projects. Air drying relies on ambient conditions which can lead to over-drying in some areas and insufficient drying in others.
Prevention of Defects
Kiln drying reduces the risk of defects like warping, twisting, checking, and case hardening that commonly occur with air drying. By carefully regulating the drying process, you can minimize these issues and end up with higher quality lumber.
Reduced Insect/Fungi Issues
The high heat levels in a kiln kill any insects, larvae, or fungi present in freshly cut wood. This protects your dried lumber from future infestations or decay.
With your own small-scale kiln, you gain much tighter control over the entire drying process from green wood to ready-to-use lumber. While it requires some upfront effort, kiln drying allows dedicated woodworkers to achieve professional results at home.
Types of Wood for Kiln Drying
When it comes to kiln drying wood at home, both hardwoods and softwoods can be successfully dried using a DIY kiln. However, there are some key differences to consider.
Hardwoods like oak, maple, and cherry tend to be denser and more prone to drying defects like checking, honeycombing, and case hardening if not dried properly. Green hardwood logs fresh from the tree typically have very high moisture contents of 60-100%. Allowing hardwoods to partially air dry down to 30-40% moisture content before kiln drying can help prevent major drying issues.
Softwoods such as pine, cedar, and fir are generally more forgiving when it comes to kiln drying. Their less dense structure makes them dry more evenly with less risk of defects. Green softwood logs may have moisture contents of 100% or higher initially. Kiln drying can begin with softwoods at higher green moisture levels compared to hardwoods.
Both green and air-dried wood can be successfully kiln dried at home. Air drying first helps relieve drying stresses and gets the moisture down to 20-30% for most species before kiln drying. This can accelerate the kiln cycle. However, green wood can go directly into a kiln as well, it will just take longer total drying time.
For best results, wood should be dried down to the final desired moisture content for its intended use, typically between 6-12% for most indoor woodworking projects. Monitoring moisture levels with a quality wood moisture meter is essential.
Materials Needed for Building a DIY Wood Kiln
To build your own basic wood kiln at home, you’ll need to gather the following materials:
Lumber and Plywood
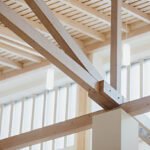
The main structure will be framed out of standard dimensional lumber like 2x4s and sheathed with plywood sheets. Choose kiln-dried lumber to prevent any issues with moisture content. You’ll need enough to build a small room or box, around 4x4x6 feet or larger depending on your drying needs.
Insulation
Rigid foam insulation boards are ideal to insulate the walls, floor and ceiling of your kiln. Look for high R-value insulation rated for outdoor use.
Plastic Sheeting
Heavy plastic sheeting, like 6-mil construction plastic, will seal the interior and contain the heat and moisture. You’ll need enough to cover the interior surfaces.
Heating Element
An electric space heater, ceramic heater, or even a basic light bulb can provide the heat source. Choose one rated for continuous operation.
Fans
One or two high-temperature fans will circulate the air and prevent hot spots. Clip-on or box fans work well.
Dehumidifier
A small dehumidifier, or even desiccants like rock salt, will help remove moisture from the air inside the kiln.
Temperature and Humidity Monitoring
Install a thermostat or thermometer to monitor the interior temperature. A humidity meter or hygrometer is also very useful.
With some basic tools and easy to find materials, you can build an effective small-scale wood drying kiln right at home.
How To Build A Wood Kiln
Step-by-Step Guide to Building a Small Wood Kiln
Building your own small wood kiln is a rewarding DIY project that allows you to dry and cure lumber at home. Here’s a step-by-step guide to constructing a basic kiln chamber:
- Frame the Kiln Body
- Use 2×4 or 2×6 lumber to build a rectangular frame for the kiln chamber, about 4-6 feet wide and 6-8 feet long.
- Ensure the frame is square and level, and add cross-bracing for stability.
- Leave space for a door on one of the narrow ends.
- Insulate the Walls
- Line the interior walls of the frame with rigid foam insulation boards or fiberglass batting.
- This will help retain heat and maintain consistent temperatures inside the kiln.
- Install Vapor Barrier
- Cover the insulated walls with a vapor barrier, such as 6-mil polyethylene plastic sheeting.
- Seal all seams and edges with aluminum tape to prevent moisture escape.
- Build the Door
- Construct an insulated door frame using 2×4 or 2×6 lumber, similar to the kiln body frame.
- Insulate the door with rigid foam boards and cover with vapor barrier.
- Attach the door to the kiln frame using sturdy hinges, and add a latch or clasp to secure it.
- Create Venting System
- Install a vent near the top of one end wall to allow moist air to escape.
- Add an intake vent near the bottom of the opposite end wall for fresh air circulation.
- Use adjustable vents or louvers to control airflow during operation.
- Set Up Heating and Circulation
- Place an electric space heater or other heat source inside the kiln, positioned away from the wood stacks.
- Install one or more fans to circulate the heated air throughout the chamber.
- Consider adding a humidifier or dehumidifier to control moisture levels, if needed.
- Load the Wood
- Stack the lumber you want to dry inside the kiln, leaving space between boards for airflow.
- Use stickers or spacers to separate each layer of boards.
- Arrange the stacks to allow good air circulation around all sides.
- Monitor and Adjust
- Use a thermometer and hygrometer to track the temperature and humidity levels inside the kiln.
- Adjust the heat source, vents, and fans as needed to maintain ideal drying conditions.
- Check the moisture content of the wood periodically using a moisture meter.
By following these steps, you’ll have a functional small wood kiln that can efficiently dry and cure your own lumber at home. Remember to prioritize safety, proper ventilation, and monitoring throughout the drying process.
Operating Your Homemade Wood Kiln
Once your DIY wood kiln is built, it’s time to start drying lumber. Proper operation is crucial for efficient drying and high-quality results.
Loading the Kiln
Stack the wood to be dried on sturdy, level kiln stickers or spacers to allow for good airflow between each layer. Avoid overcrowding the kiln, as this can restrict air circulation and lead to uneven drying. Leave a gap of at least 1 inch between the wood and the kiln walls.
Controlling Temperature and Humidity
Maintaining the proper temperature and humidity levels inside the kiln is essential. The ideal temperature range is typically between 120°F to 160°F (49°C to 71°C). Use a reliable thermometer to monitor the internal temperature constantly.
As for humidity, you’ll want to start at a higher relative humidity of around 65-75% and gradually decrease it as the drying process progresses. This prevents the wood from drying too quickly on the outside while remaining wet on the inside, which can lead to cracking and other defects.
Monitoring the Drying Process
Check on the wood regularly, looking for signs of uneven drying or defects. Use a moisture meter to track the moisture content of the wood throughout the drying cycle. Different species will have varying ideal final moisture content levels, but a general target is around 6-8% for most indoor woodworking projects.
Adjust the temperature, humidity, and airflow as needed to ensure consistent drying. Rotate the stock periodically to expose all surfaces evenly. The drying process can take several weeks or even months, depending on the thickness of the lumber and the wood species.
Drying Times for Different Woods
The drying time for wood in a kiln can vary significantly depending on several factors. The thickness of the lumber is a major determinant, with thicker boards taking much longer to dry than thinner ones. Wood density also plays a role, as denser hardwood species tend to dry more slowly than softer, less dense woods.
As a general guideline, kiln drying 1-inch thick hardwood lumber from a green (freshly cut) moisture content down to 6-8% can take anywhere from 10 days to 4 weeks. Thicker 2-inch hardwood boards may require 4-8 weeks of kiln time. Softwoods like pine and cedar dry more rapidly, with 1-inch thick stock often ready in 5-14 days.
Here are some typical drying schedules for common wood species at 1-inch thickness:
- Oak: 3-5 weeks
- Maple: 2-4 weeks
- Ash: 2-3 weeks
- Walnut: 3-6 weeks
- Cherry: 2-4 weeks
- Mahogany: 4-6 weeks
- Pine: 7-14 days
- Cedar: 5-10 days
The drying schedule involves gradually increasing the heat and lowering humidity over time. Starting at milder 110°F temperatures prevents wood from drying too rapidly on the outer surfaces. As drying progresses, temperatures are raised to 140-160°F to remove the remaining internal moisture.
Monitoring moisture content with a wood meter is crucial to avoid over-drying or under-drying the lumber. Most woods should finish between 6-8% moisture content for interior use. Patience and careful monitoring are required to achieve evenly dried, quality lumber.
Ideal Temperature and Humidity for Kiln Drying
Maintaining the ideal temperature and humidity levels inside your wood kiln is crucial for efficient and successful drying. The recommended settings may vary slightly based on the type of wood you’re drying and its initial moisture content.
For most hardwoods and softwoods, the optimal kiln temperature range is between 120°F to 160°F (49°C to 71°C). Start at the lower end of this range and gradually increase the temperature as the wood dries to prevent excessive case hardening and checking.
As for humidity, aim for a relative humidity (RH) between 25% to 40% inside the kiln. This low humidity level allows the moisture to evaporate from the wood without causing excessive drying stress or degrade.
When drying freshly sawn green wood with a high initial moisture content, begin with a higher relative humidity around 60% to 80% RH. As the wood dries down, gradually reduce the humidity in increments of 10% to 15% until reaching the target 25% to 40% RH range.
It’s essential to monitor the moisture content of the wood frequently using a reliable moisture meter. Adjust the temperature and humidity levels accordingly as the wood approaches its desired final moisture content, typically between 6% to 8% for most interior woodworking projects.
Remember, different wood species may require slightly different drying schedules. Consulting kiln drying guidelines specific to the type of wood you’re working with can help optimize the process and achieve the best results.
Testing When Wood is Properly Dried
One of the most important steps in kiln drying wood is determining when the lumber has reached the optimal moisture content for its intended use. Removing wood too early can lead to warping, checking, and other defects as it continues to dry. Leaving it in the kiln too long wastes energy and time.
The most accurate way to test moisture levels is with a wood moisture meter. These handheld tools use electrical resistance to measure the moisture content in the wood’s core. Look for meters that have insulated pins that can be driven into the wood for precise readings.
For air-dried lumber, a general target is 12-15% moisture content. For kiln dried wood, aim for 6-8% for interior woodworking projects. Exterior lumber and wood that will be re-manufactured can go down to 4-5% moisture content.
In addition to using a moisture meter, visually inspect the wood for signs of case hardening. This defect happens when the outer shell dries much faster than the inner core. Look for darker colors, surface checks, or washboarding patterns on the face of the boards.
Run your hands along the wood surfaces – properly dried lumber should feel warm and lack any cool, damp spots. Rap on the ends with a knuckle – you should hear a higher pitched, hollow tone when the wood is well dried.
Be sure to take moisture readings from multiple boards and different locations on each piece. Pay close attention to the thicker cuts of wood, as they will take longer for the core to reach the target moisture levels.
Troubleshooting Common Kiln Drying Issues
Uneven drying is one of the most frequent problems with kiln drying wood at home. This occurs when parts of the wood lose moisture faster than others, leading to warping, twisting, or uneven shrinkage. To prevent this, ensure proper air circulation by positioning fans strategically and stacking the wood with consistent spacing using stickers. Monitor the moisture content regularly with a wood moisture meter and adjust conditions as needed.
Cracks and splits can develop in the wood during the drying process, especially with thicker pieces or woods prone to drying defects like oak. Start with lower temperatures and gradually increase heat to allow the wood to dry slowly from the inside out. Using an appropriate drying schedule based on wood thickness and species also helps minimize cracking.
Staining and discoloration may appear if the kiln gets too hot or lacks sufficient air circulation. Reduce temperatures, improve ventilation, and consider adding a dehumidifier to control moisture levels. Some staining is normal with certain wood types like maple, but severe discoloration could indicate issues like mold growth or chemical reactions.
Mold growth is a risk when drying green wood with high moisture content. Mold thrives in warm, humid conditions with poor air flow. Keep temperatures above 100°F to discourage mold spores, ensure proper ventilation, and consider using a dehumidifier or adding borate to the kiln. Regularly inspect for any signs of mold and take immediate action if found.
Other common issues include case hardening (dry outer shell with wet core), honeycomb (alternating wet/dry areas), and collapse (flattening of wood cells). Carefully following drying schedules, monitoring conditions, and allowing the wood to condition properly after drying can help prevent most defects.
FAQs on DIY Wood Kiln Design and Use
Can you use a wood kiln outdoors?
Yes, you can build and operate a wood kiln outdoors. In fact, many hobbyists prefer an outdoor kiln setup for better ventilation and to avoid moisture buildup inside the home. An outdoor kiln does need to be well-insulated and weatherproofed to maintain consistent temperatures. Situating it under an overhang or simple roof structure can help protect it from rain and snow.
What size kiln do I need for drying small batches of wood?
For drying small amounts of lumber at a time, a compact kiln around 4x4x8 feet should suffice. This allows enough space for narrow stickered stacks of 4-foot long boards. A kiln this size is manageable for DIY construction and fits in many backyards or garages. Smaller hobby-scale kilns down to 2x2x4 feet can work for drying just a few boards at once.
Is kiln dried wood better than air dried?
In most cases, yes – kiln drying produces superior results compared to simply air drying lumber. A controlled kiln environment allows you to dry wood much faster while preventing issues like case hardening, honeycomb, and severe cracking or warping. Kiln dried wood is also drier overall with a lower equilibrium moisture content.
Do I need special ventilation for a homemade wood kiln?
Proper ventilation is crucial for safe and effective kiln operation. At minimum, you’ll need an exhaust fan or vent to remove moist air during the drying cycle. An intake vent or fan is also recommended to create airflow across the wood stacks. The vents should be located to avoid short-circuiting the airflow.
What is the difference between a solar kiln and electric kiln?
A solar kiln relies on the sun’s radiant heat passing through transparent walls or roofing to create the warm, dry environment for drying wood. An electric kiln uses one or more heating elements along with thermostat controls to generate and regulate the interior temperatures. Solar kilns are very economical but limited by the available sunlight hours and weather conditions. Electric kilns allow for consistent 24/7 operation but utilize more energy.

Tonja Nichols Ray is a creative author and DIY enthusiast who shares her passion for repurposing old items on social media. On her Instagram account @tonja.nichols, she showcases beautiful transformations of everyday objects into unique and functional pieces.
As a contributor to the website scrapsafari.com, Tonja writes detailed guides and tutorials, helping her readers discover the joys of breathing new life into vintage and discarded materials. With an eye for design and a knack for crafting, she inspires her followers to approach home decor and personal projects from a sustainable, eco-friendly perspective.