Faux wood beams are decorative, non-structural beams designed to mimic the look of real wood ceiling or support beams. They provide an easy and affordable way to add architectural interest, character, and dimension to any room. While real wood beams can be costly and require professional installation, faux beams offer a DIY-friendly alternative that allows for complete customization of size, shape, finish, and placement.
Unlike load-bearing beams, faux wood beams are lightweight and primarily serve an aesthetic purpose. They can be made from lightweight wood like pine or poplar, or even hollow/composite materials. This makes them much easier to install compared to cumbersome solid wood beams. Faux beams let you achieve a warm, rustic ambiance and the visual appeal of exposed wood beams without the high cost and structural considerations.
With faux beams, you have the flexibility to create any look you desire – from smooth and refined to distressed and aged. They can be stained or painted any color to complement your home’s interior design. Faux wood beams are also incredibly versatile – you can install them on ceilings to add visual height, or mount them on walls to frame spaces or accentuate architectural features. Their transformative effect allows you to add instant character and coziness to bland, boring rooms on a budget.
Materials Needed
To create beautiful, rustic faux wood beams, you’ll need the following materials:
- Wood boards: 1x4s, 1x6s, 1x8s, or a combination of these sizes. Popular wood choices include pine, poplar, and cedar.
- Wood glue: A strong, water-resistant wood glue for adhering the boards together.
- Nails or brad nails: 16-gauge nails or brad nails, along with a nail gun for easy installation.
- Wood putty: To fill any gaps, holes, or imperfections in the wood beams.
- Sandpaper: Various grits, from coarse (80-100 grit) to fine (220 grit), for sanding and distressing.
- Stains and paints: Wood stains in your desired shade, as well as paint colors for the base coat and distressing.
- Primer: A quality primer to help the paint adhere properly to the wood surface.
- Polyurethane: A clear, protective polyurethane finish in your preferred sheen (satin, semi-gloss, or gloss).
Having all these materials on hand will ensure a smooth and successful faux beam building process.
Tools Required
To build faux wood beams, you’ll need a few essential tools. A miter saw or circular saw is crucial for cutting the wood boards to the desired lengths. A miter saw allows for precise angled cuts, while a circular saw is a versatile option for straight cuts.
A drill is necessary for pilot holes and countersinking nails or screws. A nail gun, specifically a brad nailer, will make the assembly process much faster and easier than using a hammer.
For smoothing out the surfaces and creating a distressed look, you’ll need a sander. A random orbit sander is ideal for larger surfaces, while detail sanders can access tight spaces and edges.
When it comes to painting and staining, you’ll require quality paintbrushes and paint rollers. Natural bristle brushes are best for oil-based stains and paints, while synthetic brushes work well with water-based products. A good paint roller will ensure an even application and a smooth finish.
Having the right tools on hand will not only make the project easier but also ensure professional-looking results for your faux wood beams.
How To Build Faux Wood Beams
Step 1: Cut Wood to Length
Determining the proper length for your faux wood beams is crucial for a seamless installation. Carefully measure the dimensions of the room where you’ll be installing the beams, taking into account any obstacles like doors, windows, or light fixtures.
Once you have the room measurements, decide on the desired length for your beams. It’s generally recommended to have the beams span the entire length of the room for a cohesive look. However, you can also create shorter sections if needed.
With your desired beam length in mind, use a miter saw or circular saw to cut your wood boards to the appropriate size. For a clean, straight cut, make sure to clamp the boards securely before cutting. If you’re working with longer boards, you may need to enlist a friend’s help or use sawhorses to support the boards during the cutting process.
Take your time during this step, as precise measurements and straight cuts will ensure a professional-looking final product. Double-check your measurements before making any cuts, and consider cutting a few extra inches to account for any minor adjustments that may be needed during installation.
Step 2: Create the Beam Shape
Building up layers of wood boards is the key to creating a thick, dimensional faux wood beam. Start by laying out your first layer of boards on a flat surface. Apply a generous amount of wood glue along the edges of each board, then join them tightly together side-by-side to form the base layer.
Once the glue has set, it’s time to start stacking and nailing on additional layers to build up the beam’s thickness. Place the next layer of boards perpendicular to the first layer, spreading wood glue on the underside before pressing them firmly into place.
Use a nail gun to drive 2-inch brad nails through the top boards and into the layer below every 6-8 inches. This will securely lock the layers together as you build up the beam’s depth. Stagger the joints between each layer for maximum strength.
For an 8-inch deep beam, you’ll typically want 3-4 layers of 1×6 boards. Adjust the number of layers based on your desired beam dimensions. The more layers, the chunkier and more substantial the beam will look. Take your time to ensure each layer iseven, square, and tightly fitted together.
Step 3: Sand and Fill Gaps
Once the beam shape is assembled and the wood glue has fully dried, it’s time to smooth out the surface. Using a palm sander or orbital sander, go over the entire beam with 80-100 grit sandpaper. Sand in the direction of the wood grain to avoid scratches.
Pay close attention to the seams where the boards meet. These areas may be slightly raised or have small gaps. Use a sanding block or detail sander to knock down any high spots and smooth the seams flush.
After sanding, inspect the beam closely for any holes, cracks, or gaps between boards. These need to be filled with wood putty so you have a smooth, seamless surface for finishing. Use a putty knife to press wood filler deep into the gaps, overfilling slightly.
Allow the wood putty to fully dry according to the manufacturer’s instructions, then sand the filled areas smooth. Start with a coarse 80 grit paper to level the putty, then progress through finer grits like 120 and 180 to blend it seamlessly with the surrounding wood.
Wipe away any remaining wood dust with a clean rag or tack cloth. The beam shape should now be smooth and ready for the priming and painting steps to achieve that perfect rustic look.
Step 4: Prime and Paint Base Coat
After sanding and filling any gaps or holes, it’s time to apply a primer coat to the faux wood beams. Priming helps the paint adhere better and provides a smooth, even base for the topcoats. Use an interior latex primer and apply it with a brush or roller, making sure to cover all surfaces of the beam thoroughly.
Once the primer is dry, you can begin painting the base coat color. The base coat sets the foundation for the rustic, aged look you’re going for. Consider using a warm neutral shade like tan, khaki, or greige as the base. Apply the paint in long, even strokes with a brush or roller, covering any exposed primer. Allow the base coat to dry completely before moving on to the next step of distressing or adding additional paint colors.
Step 5: Distress for Rustic Look (Optional)
Creating an authentic, aged look is key to achieving that rustic faux wood beam style. There are several distressing techniques you can use to make your beams look like they’ve been around for decades.
Sanding is one of the easiest ways to distress. Use a coarse 60-80 grit sandpaper and focus on the edges, corners, and high-traffic areas where natural wear would occur. Sand until you expose some of the bare wood underneath for a worn appearance.
Chipping paint is another effective method. Once your base coat is dry, use a utility knife, paint scraper or wire brush to strategically chip and scrape off paint in random areas. Focus on edges and corners for the most realistic look.
You can also wipe on stain and quickly wipe it back off in areas to create a naturally aged, irregular tone. The key is being random – don’t make distressing look uniform.
For an extreme aged look, beat the wood with a chain, hammer, or other tools to dent and distress the surface. Just be careful not to split or crack the wood.
Finally, mix glazes and washes using stains, paints and water to rub into crevices and low areas, mimicking built-up grime and dirt over time. This adds beautiful depth and dimension.
The more layers, textures and randomness you incorporate through these distressing techniques, the more authentic your rustic faux wood beams will look.
Step 6: Apply Stain or Final Paint Coat
At this stage, you’ll apply the finishing touches to achieve your desired look for the faux wood beams. You have two main options – wood stain or paint.
Applying Wood Stain
Staining allows the natural wood grain to show through for a more rustic, authentic appearance. Before staining, wipe away any dust with a clean rag. Then apply the wood stain with a rag or brush in the direction of the wood grain. Work in small sections, wiping away any excess stain as you go. You may need to apply multiple coats to reach your desired color depth. Allow each coat to dry fully before adding the next.
Consider using gel stains which provide a thicker, more uniform coverage compared to traditional liquid stains. You can even layer different stain colors – for example, use an ebony stain as a base coat then apply a warm honey stain over top, wiping away the excess for a distressed look.
Painting the Final Color Coat
If you prefer a solid color look, use a high-quality paint made specifically for cabinets, trim or furniture. Latex paints work well and come in endless color options. Apply 2-3 thin, even coats with a brush or roller, allowing each coat to dry completely. Lightly sand between coats for a smooth finish.
For an authentic, aged paint look, opt for milk paint, chalk paint or mineral paint in a color like off-white, light gray or beige. These paints naturally chip and distress over time for vintage character. You can also manually distress the paint by sanding along the edges and corners after it dries.
No matter which finish you choose, take your time on this step – the stain or paint will ultimately set the overall tone and style for your faux beams.
Step 7: Seal with Polyurethane
Applying a protective polyurethane topcoat is crucial for ensuring your faux wood beams withstand the test of time. Polyurethane acts as a clear, durable sealant that protects the stain or paint finish from scratches, moisture, and general wear and tear.
Once your beams have been stained or painted to your desired look, allow the finish to fully dry per the manufacturer’s instructions. Then, use a high-quality polyurethane designed for interior wood projects. Both oil-based and water-based polyurethanes are available, but oil-based tends to be more durable and moisture-resistant.
For best results, apply the polyurethane in thin, even coats using a high-quality brush or foam applicator. Work in the direction of the wood grain, and be sure to coat all sides and edges of the beams. Allow each coat to dry completely before adding the next, typically 4-6 hours of drying time between coats.
Most projects will require 2-3 coats of polyurethane for optimal protection. The more coats applied, the higher the sheen and level of protection. If you prefer a more matte finish, look for a satin or flat polyurethane sheen.
Take proper ventilation precautions when working with polyurethane, as the fumes can be potent. Once fully cured, usually within 24-48 hours, your faux beams will have a tough, clear finish that safeguards your hard work for years to come.
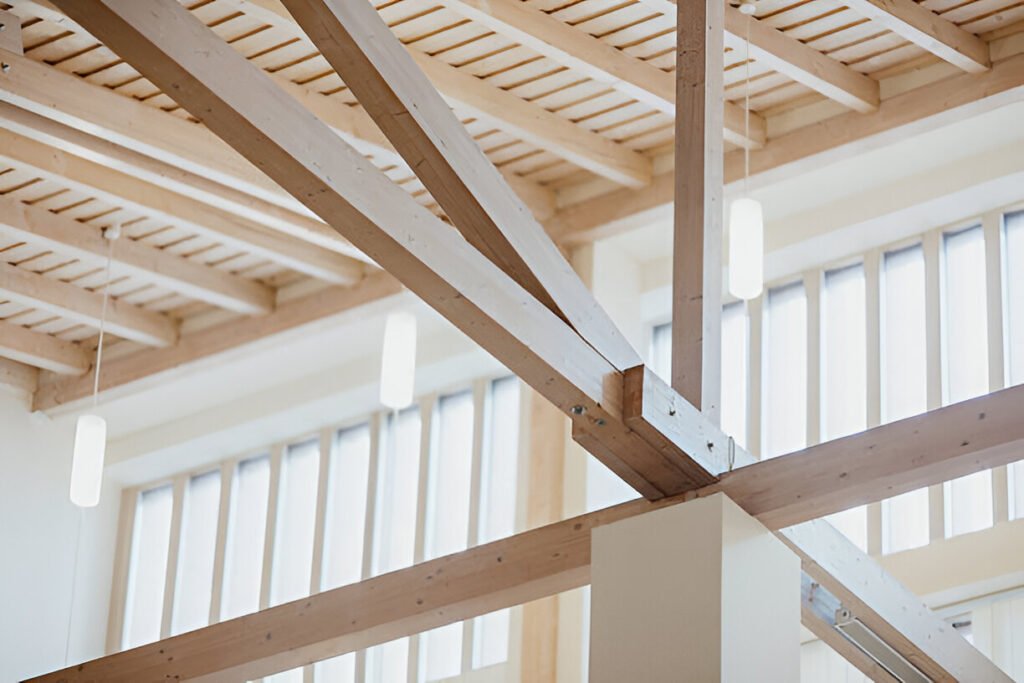
Step 8: Install Beams on Wall/Ceiling
Once your faux wood beams are finished, it’s time to install them on the wall or ceiling. This step requires some careful planning and preparation to ensure the beams are securely attached and look seamless.
First, decide on the placement of the beams. Measure the area and mark guidelines with a pencil where each beam will be positioned. It’s best to install the beams perpendicular to the ceiling joists for added support and stability.
Next, use a stud finder to locate the wall or ceiling joists. These solid wooden beams behind the drywall provide a sturdy anchor point for attaching the faux beams. Make pencil marks along the joists to guide your nailing points.
Using a nail gun and galvanized nails appropriate for the project, nail through the top edge of the faux beam directly into the ceiling joists. Space the nails every 12-16 inches along the beam’s length for a secure hold. For wall installations, nail through the back of the beam into the wall studs at the same intervals.
To create a polished, built-in look, add trimming pieces along the edges of the installed beams. Cut wood trim boards to size using a miter saw, ensuring tight joints at the corners. Nail or glue the trim directly to the wall or ceiling, flush with the edges of the faux beams. This trimming helps conceal any gaps and gives a cohesive, finished appearance.
For longer beam spans, you may need to add support blocks between the beam and ceiling at intervals. These unobtrusive blocks help prevent sagging over time from the beam’s weight.
With the beams securely installed and trimmed out, you’ve successfully added architectural character and dimension to your space using easy-to-install faux wood beams.
Design Tips and Considerations
When incorporating faux wood beams into your home, there are several design factors to keep in mind to achieve a cohesive and visually appealing look:
Beam Size and Spacing
The size of your faux beams should be proportional to the size of the room. As a general rule, larger rooms can accommodate bigger, chunkier beams, while smaller spaces look best with more slender beams. Spacing between beams is also crucial – they should be positioned far enough apart to avoid a cluttered appearance, but close enough to create a sense of rhythm and structure.
Distressing Techniques
Distressing your faux beams is an excellent way to achieve a rustic, time-worn aesthetic. You can use a variety of techniques, such as sanding, chipping, or even hitting the beams with a chain or hammer to create dents and imperfections that mimic the look of aged wood. Additionally, you can apply a wood-aging solution or create a custom stain to enhance the distressed appearance.
Matching Wood Tones
When selecting wood tones for your faux beams, consider the existing color palette and architectural elements in the room. If you have hardwood floors or exposed wooden beams, aim to match the tones as closely as possible for a cohesive look. Alternatively, you can choose a contrasting tone to create a visually striking focal point.
Complementing Architectural Style
The style of your faux wood beams should complement the overall architectural style of your home. For example, in a rustic or farmhouse-style home, rough-hewn, heavily distressed beams would be an appropriate choice. In a more modern or contemporary space, sleek, minimalist beams with clean lines and a natural wood finish may be a better fit.
By carefully considering these design factors, you can create a stunning and harmonious look with your DIY faux wood beams, adding character and warmth to any room in your home.
Cost and Money-Saving Tips
Creating faux wood beams is a budget-friendly way to add architectural interest and character to your home. The materials required are relatively inexpensive compared to the cost of real wood beams. Here’s an estimated breakdown of materials for a typical project:
- Wood boards (1x4s, 1x6s, etc.): $50-$100
- Wood glue: $5-$10
- Brad nails and nail gun: $20-$50 (if you don’t already own one)
- Wood putty: $5
- Sandpaper: $10
- Stain or paint: $20-$40
- Primer: $10-$20
- Polyurethane: $15-$25
The total cost can range from $135 to $280, depending on the size of your project and the quality of materials you choose.
To save even more money, consider these tips:
- Use inexpensive wood like pine or poplar for the beams.
- Check for discounted or damaged wood boards at your local home improvement store.
- Make your own wood putty by mixing sawdust and wood glue.
- Use leftover paint or stain from previous projects.
- Rent a nail gun instead of buying one if it’s a one-time project.
- Shop sales and use coupons for materials whenever possible.
- Tackle the project yourself instead of hiring a contractor.
With some creativity and resourcefulness, you can create stunning faux wood beams on a tight budget, adding warmth and character to your space without breaking the bank.
Conclusion and DIY Benefits
Adding faux wood beams is an easy and affordable way to enhance any room with architectural character and visual interest. By following the step-by-step process outlined, even a beginner DIYer can create stunning rustic beams tailored to their design preferences.
One of the biggest advantages of a DIY faux beam project is the cost savings compared to hiring a contractor for real wood beam installation. The materials are relatively inexpensive, especially if you use more budget-friendly wood options like pine. And with some basic tools and elbow grease, you can achieve a high-end, custom look for a fraction of the cost.
Beyond the financial benefits, there’s also immense satisfaction that comes from a hands-on DIY project. Crafting the beams yourself allows you to fully customize the color, finish, level of distressing, and beam dimensions to perfectly complement your room’s style. You have complete control over the final look.
When it comes to design inspiration, faux beams provide endless possibilities to transform any space. In a living room, thick, rough-hewn beams can add warmth and coziness. In a kitchen, clean-lined beams can highlight the room’s focal point like an island or range hood. Bedrooms benefit from the architectural interest of beams, creating a retreat-like ambiance. Even bathrooms can leverage the rustic-chic aesthetic of faux wood beams when installed on ceilings or framing a mirror.
So roll up your sleeves, break out the tools, and get ready to add character, dimension, and designer flair to your home – one DIY faux wood beam at a time!

Tonja Nichols Ray is a creative author and DIY enthusiast who shares her passion for repurposing old items on social media. On her Instagram account @tonja.nichols, she showcases beautiful transformations of everyday objects into unique and functional pieces.
As a contributor to the website scrapsafari.com, Tonja writes detailed guides and tutorials, helping her readers discover the joys of breathing new life into vintage and discarded materials. With an eye for design and a knack for crafting, she inspires her followers to approach home decor and personal projects from a sustainable, eco-friendly perspective.